Christmas Lesson-04-2021
Translation made by MARION


Benodigdheden
Material

Included with the material is an empty frame..
You can put your own photo in it
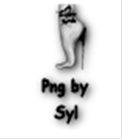
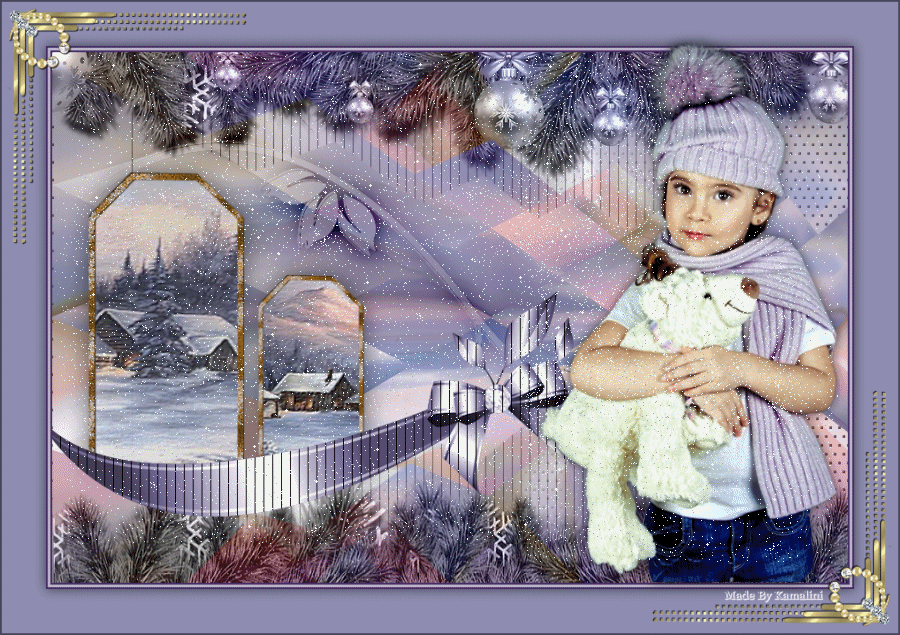
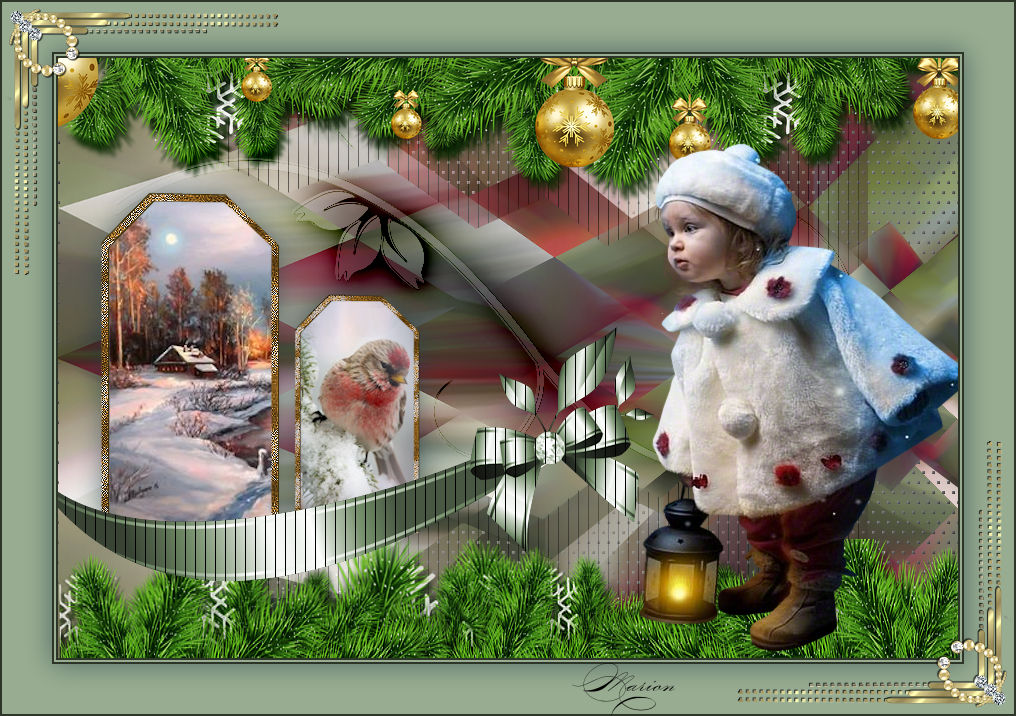
Tube--- SvB Kerst meisje met lantaarn.png
Many, many thanks Syl for the gorgeous tube.
Filter
Filters---AP 01 (Innovations)-lines-Silverlining
Preparation
Material Properties: Set your foreground color to color #98ac91---Set your background color to color #2d3529
1.
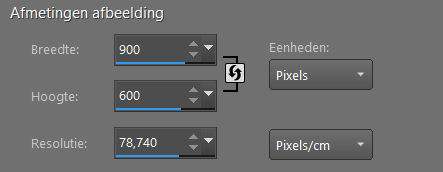
File-Open a New Transparent Image with these settings.
Width 900--- Height 600
2.
Selections-Select All
3.
Open the Tube--- deco-5.png
Edit---Copy
Activate your work -Edit - Paste Into Selection
Selections---Deselect All
4.
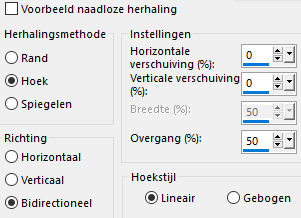
Effects- Image Effects- Seamless Tiling---Using the default settings
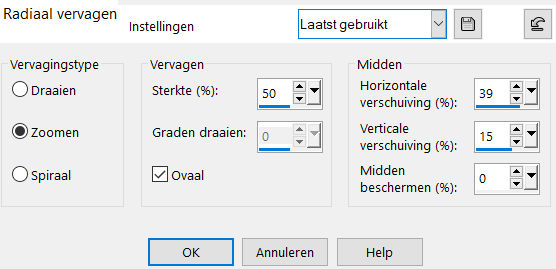
5.
Adjust- Blur- Radial Blur with these setting
Blur type---Zoom---Strength (%) 50---Horizontal offset (%) 39---Vertical ofset(%)15---Protect center(%) 0.
Checkmark at Oval
6.
Layers- Merge- Merge All(Flatten)
7.
Promote Background Layer =Raster 1
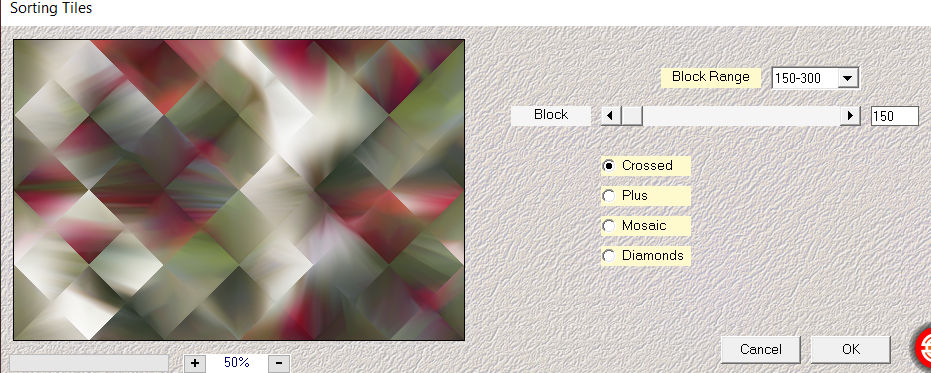
8.
Effects---Plugins---Mehdi---Sorting Tiles with these settings: ---150---300---150---Crossed
9.
Layers---Duplicate
10.
Effects---Geometric Effects---Perspective -horizontal use the settings below
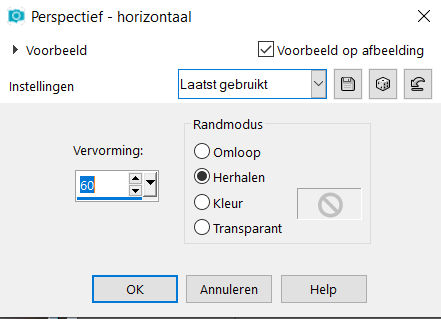
11.
Selections –load/save selection –load selection from disc and select my selection:
---kerstles-4-2051.PspSelection
Selections- Promote Selection to Layer
12.
In the Layer Palette -Activate Copy of Raster 1
Click delete on your keyboard.
Selections---Deselect All
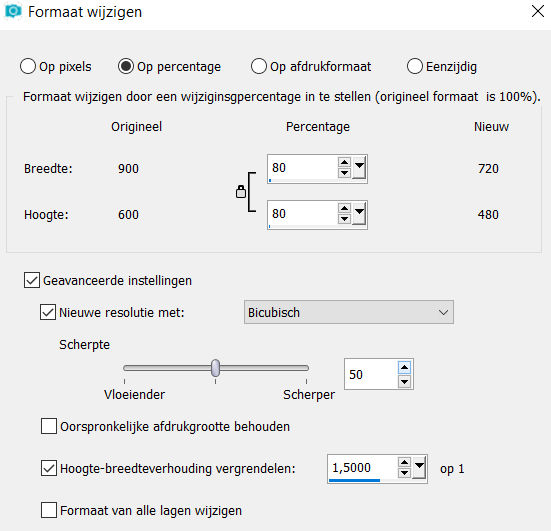
13.
Image---Resize---80 %.
Resize all layers not checked..
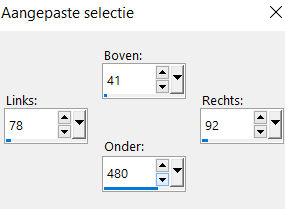
Activate Selection Tool -Custom Selection (S) -Rectangle with these settings ---41---78---92---480.
Click delete on your keyboard..

14.
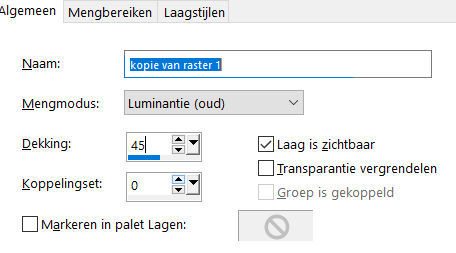
Layers-Properties-Set the Blend Mode to
" Luminance Legacy " and lower the Opacity to 45%
15.
Effects---Plugins---AP 01 (Innovations)-lines-Silverlining
---Line Options: Vertical use the settings below
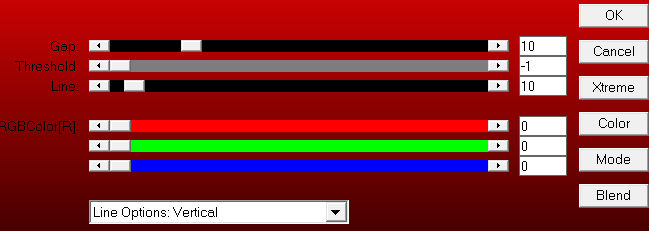
Selections---Deselect All
16.
Layers---Arrange---Bring to Top
In the Layer Palette---activate the middle layer. (promoted selection)
17.
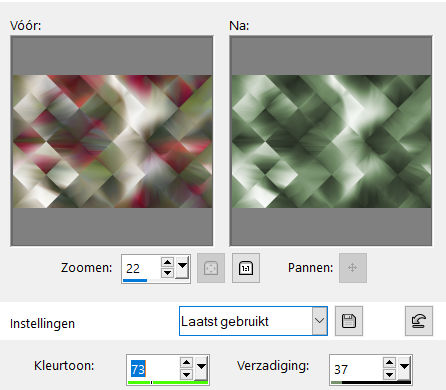
Adjust---Hue and Saturation---Colorize with these settings: 73--37
18.
Open the Tube ---stipjes.png
Edit ---Copy
Activate your work -Edit - Paste as a new layer
Layers---Arrange-Move Down (above raster 1)
19.
Activate the top of the Layer-Palette (copy of raster 1)
20.
Open the Tube --- deco-1.png
Edit ---Copy
Activate your work -Edit - Paste as a new layer
Adjust---Hue and Saturation---Colorize with these settings:
---73---37
21.
Open the Tube ---deco-3.png
Edit ---Copy
Activate your work -Edit - Paste as a new layer
Pick Tool: (K) on your keyboard -Enter these parameters on the toolbar---Position---X: 31 ---Position Y: 71

Press ( M ) to close the Pick Tool
22.
Layers-Properties-Change the Blend Mode of this layer to " Burn "
23.
Open the Tube ---deco-5.png
Edit ---Copy
Activate your work -Edit - Paste as a new layer
Pick Tool: (K) on your keyboard -Enter these parameters on the toolbar
Position---X: 40 ---Position Y: 135

Press ( M ) to close the Pick Tool
24.
Effects---3D-Effects---Drop Shadow with these settings: ---0---0---60---40---Color Black

25.
Open the Tube ---deco-2.png
Edit ---Copy
Activate your work -Edit - Paste as a new layer
Pick Tool: (K) on your keyboard -Enter these parameters on the toolbar---Position---X: min 21 Position Y: 257

Press ( M ) to close the Pick Tool
26.
Open the tube ---SvB Kerst meisje met lantaarn..png
(Remove the watermark)
Edit ---Copy
Activate your work -Edit - Paste as a new layer
Pick Tool: (K) on your keyboard -Enter these parameters on the toolbar---Position---X: 600 Position Y: 82
Press ( M ) to close the Pick Tool
27.
Effects---3D-Effects---Drop Shadow with these setting: ---0---0---60---40---Color Black
28.
Press ( M ) to close the Pick Tool
29.
Image - Add borders-Symmetric checked:2 pixels--- with your dark color
Image - Add borders-Symmetric checked:3 pixels---with your light color
Image - Add borders-Symmetric checked:2 pixels---with your dark color
Selections---Select All
Image - Add borders-Symmetric checked:50 pixels---with your light color
Effects---3D-Effects--- Drop Shadow with these settings:---0---0---6---40---Color Black
Selections---Deselect All
Image - Add borders-Symmetric checked:2 pixels---with your dark color
30.
Open the Tube ---Hoek.
Edit ---Copy
Activate your work -Edit - Paste as a new Layer
31.
Place your watermark on a new Layer.
Save as JPG
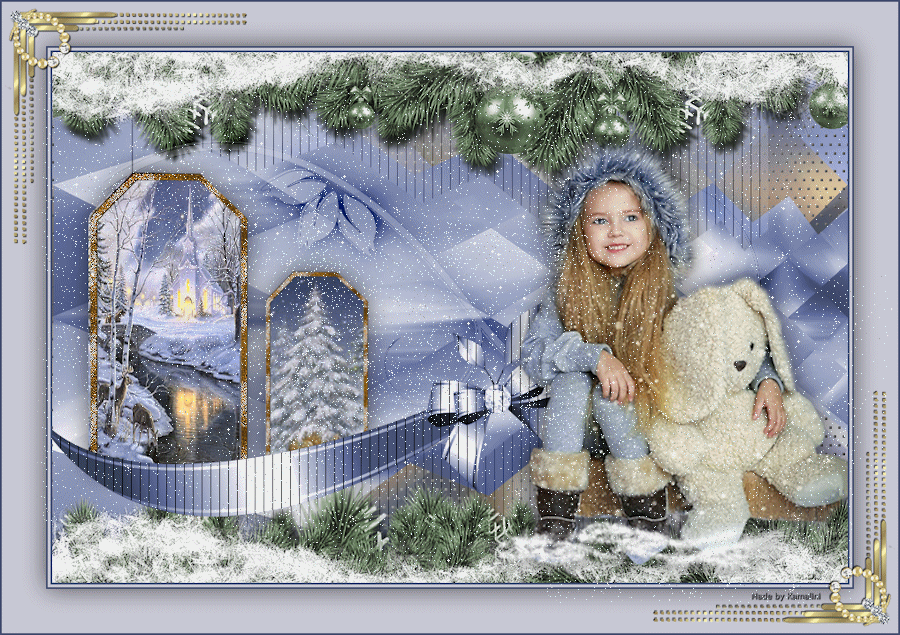
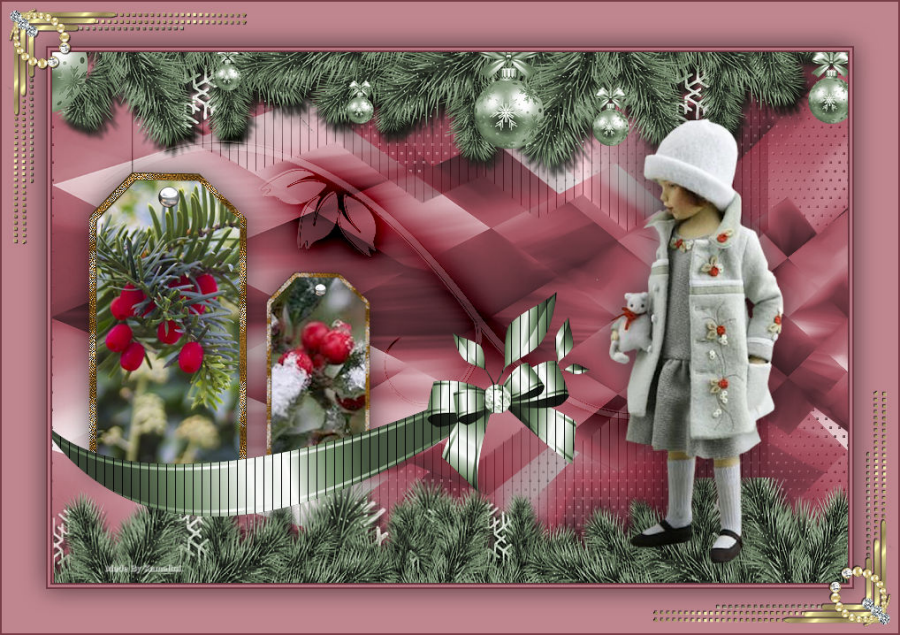
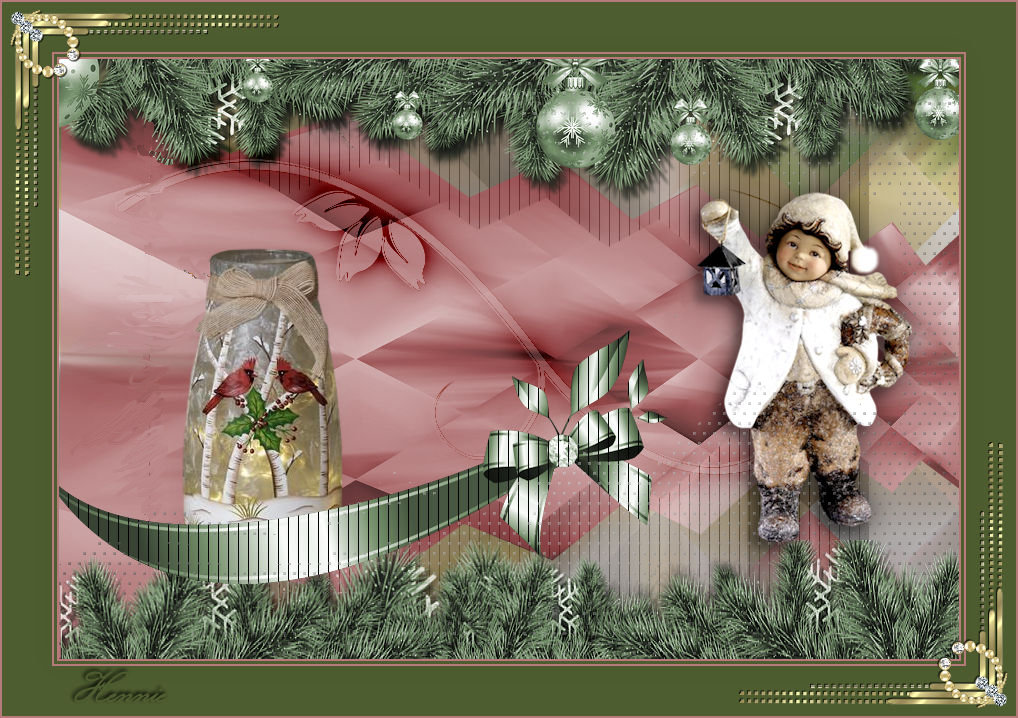
Voorbeelden zijn gemaakt door Kamalini-Hennie-Corrie---Marion

|