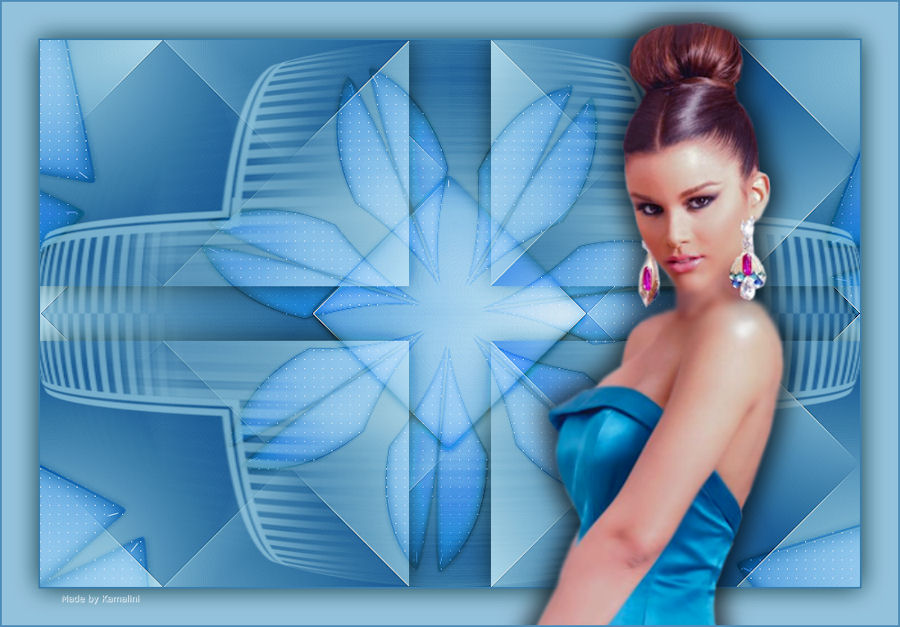
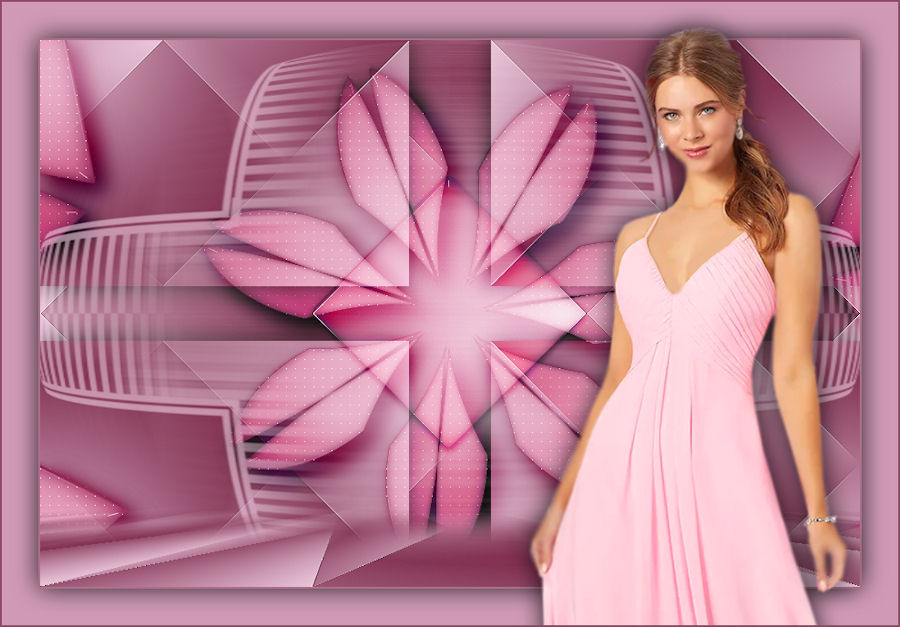
Lesson-259

Translation made by MARION
Supplies.
Material

Tube of lana.
TUBESpack@groups.io
Plugins
These filters are used.
Filter---Mehdi---Sorting Tiles
Filter---<I C Net Software> Filters Unlimited 2.0>---Simple---Half Wrap
Filter---Alien Skin Eye Candy 5: Impact---Glass
Filter---Flaming Pear---Flexify 2
Filter--- AP 01 (Innovations)-Lines-SilverLining---DottyGrid
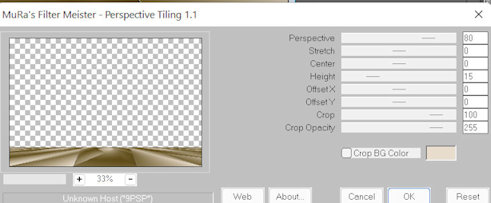
Filter--- Mura`s Meister---Perspective Tiling
Preparation
Material Properties-
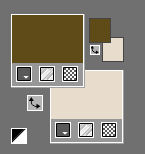
Set your Foreground color to color #5f4c19---Set your Background color to color #e8dccc
Replace your Foreground color with a Foreground/Background Sunburst Gradient with these settings:
Angle 0---Repeats 1--- Invert checked —Center Point---Horizontal 50---Vertical 50---Focal Point--- Horizontal 50---Vertical 50.Invert Checked
Center and Focal Points not checked.

Note : When working with your own colors , play with the Blend Mode and/or Opacity at your own discretion.
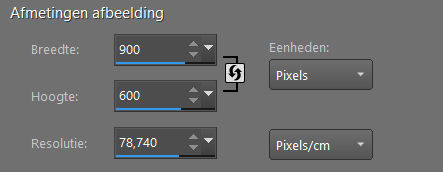
File-Open a new transparent Image ---in this size. Width---900---Height---600
.
1.
Flood Fill Tool – Fill the layer with the gradient
2.
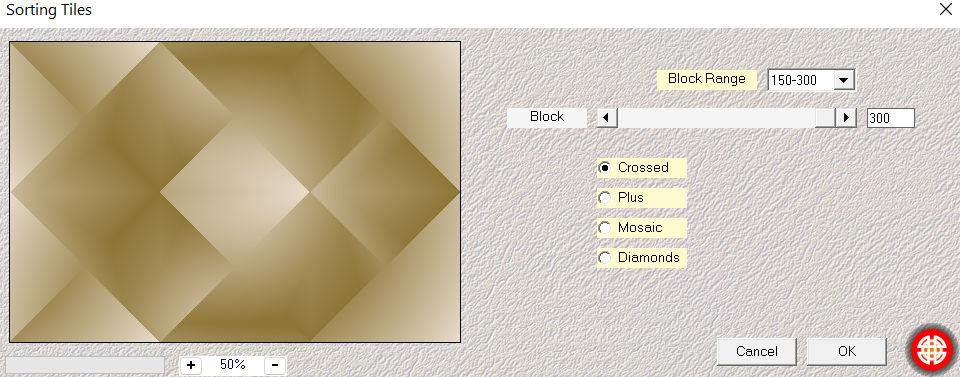
Effects---Plugins---Mehdi---Sorting Tiles---150---300---300---Crossed.
3.
Effects----Edge Effects---Enhance More.
4.
Layers---Duplicate
Image--- Resize ---90 %.

Resize all layers NOT checked.
5.
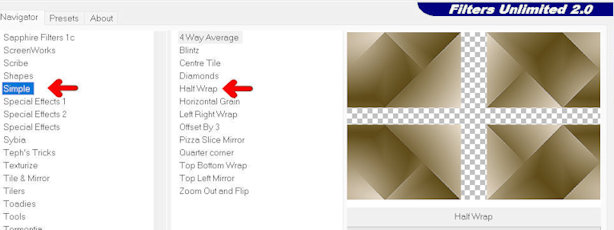
Effects---Plugins—Filter -<I C Net Software> Filters Unlimited 2.0>---Simple---Half-Wrap
6.
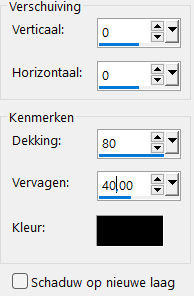
Effects---3D-Effects---Drop Shadow ----0---0---80---40---color black.
7.
In the Layer Palette- Activate ---Raster 1
Selections –load/save selection –load selection from disc and select my selection: 259-PspSelection
Selections- Promote Selection To Layer
Layers- Arrange- Bring To Top
Selections-Select none.
8.
Layers-Properties-Change the Blend Mode to " Overlay (customize to your liking)
9.
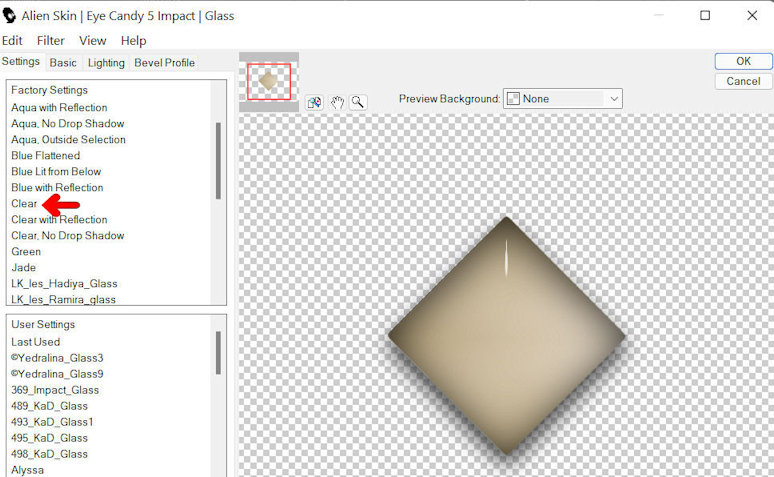
Effects---Plugins ---Alien Skin Eye Candy 5: Impact---Glass----Clear
10.
Layers---Duplicate
11.
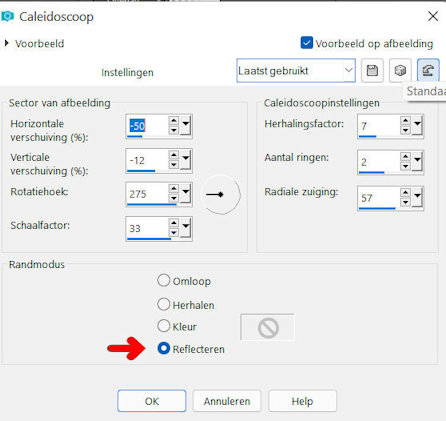
Effects---Reflection-Effects---Kaleidoscope---min 50---min12---275---33---7---2---57---Reflect checked
12.
Effects---Plugins---Filter--- AP 01 (Innovations)-Lines-SilverLining---DottyGrid---10---min1---10---3x255.

13.
Layers---New Raster Layer---Fill with the Background color . (or color white )
14.
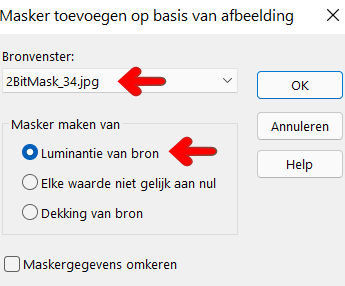
Layers- New Mask Layer –From Image ---
Select Mask ---2BitMask-34---Source Luminance---Checked.
Layers---Merge---Merge Group
15.
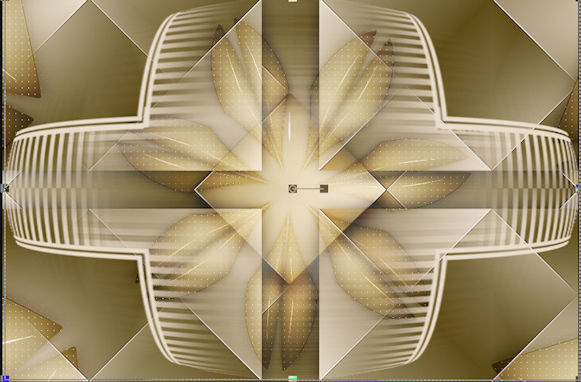
Effects---Plugins--- Filter <I C Net Software> Filters Unlimited 2.0>---Simple---Half Wrap
16.
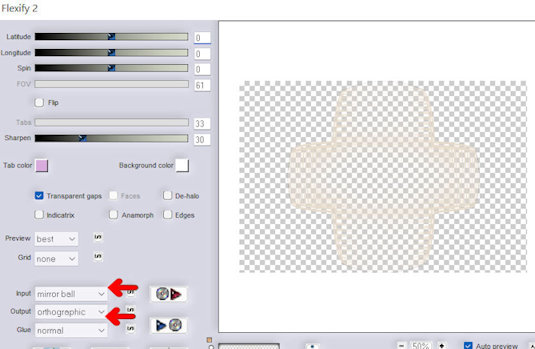
Effects---Plugins---Flaming Pear---Flexify 2--- — Input---- mirror ball---Output ---orthographic --- the
rest by default.
17.
Pick Tool: (K) on your keyboard.
Pull the left middle node to the left side
Repeat: Pull the right middle node to the right side
The Mask comes over the entire width of your workspace.
18.
Layers-Properties ------- Lower the Opacity to 65 %
Press ( M ) to close the Pick Tool
19.
Activate the bottom of the Layer Palette =---Raster 1
Layers---Duplicate
Layers---Arrange- Bring To Top---
Effects---Plugins--- Mura`s Meister---Perspective Tiling---Height 15.
Activate the Magic Wand ----Tolerance---Feather 0.---in click in the upper part.

20.
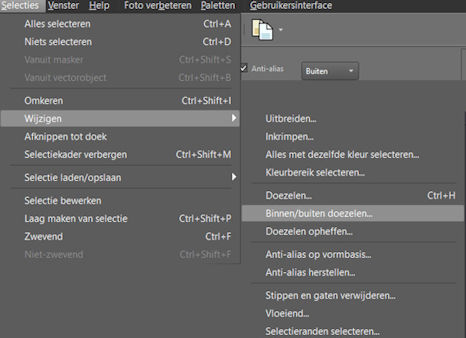
Selections---Modify---Inside/Outside Feather---Outside 40.
Click once on delete on your keyboard.

21.
Selections---Select none.
22.
Image - Add borders-Symmetric checked ---2 pixels --- with the dark color
Selections ---Select All
Image - Add borders-Symmetric checked ---40 pixels with your light color
Effects---3D-Effects---Drop Shadow ----0---0---80---40---color black.
Selections---Select none.
23.
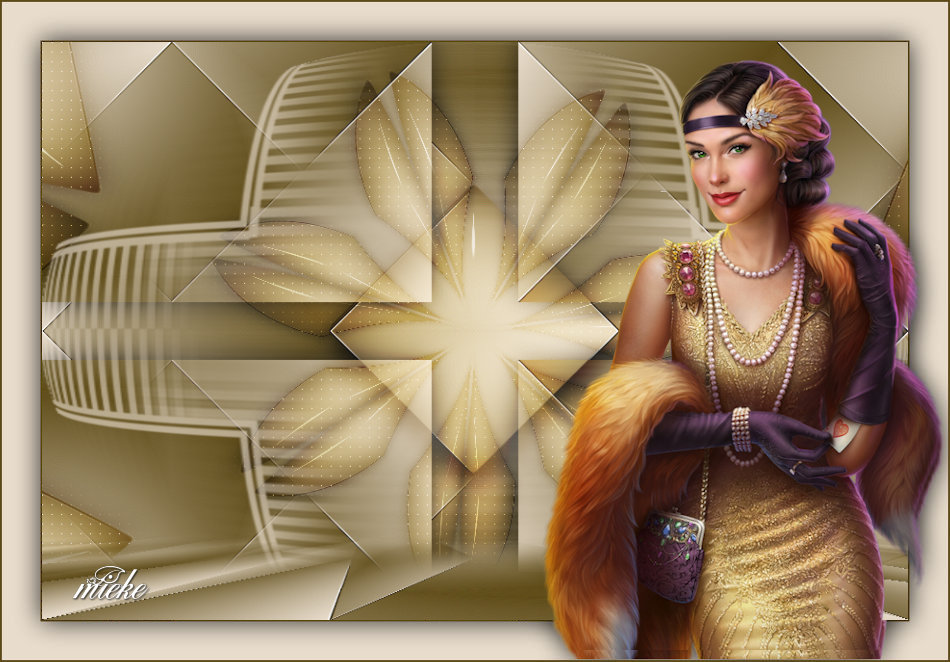
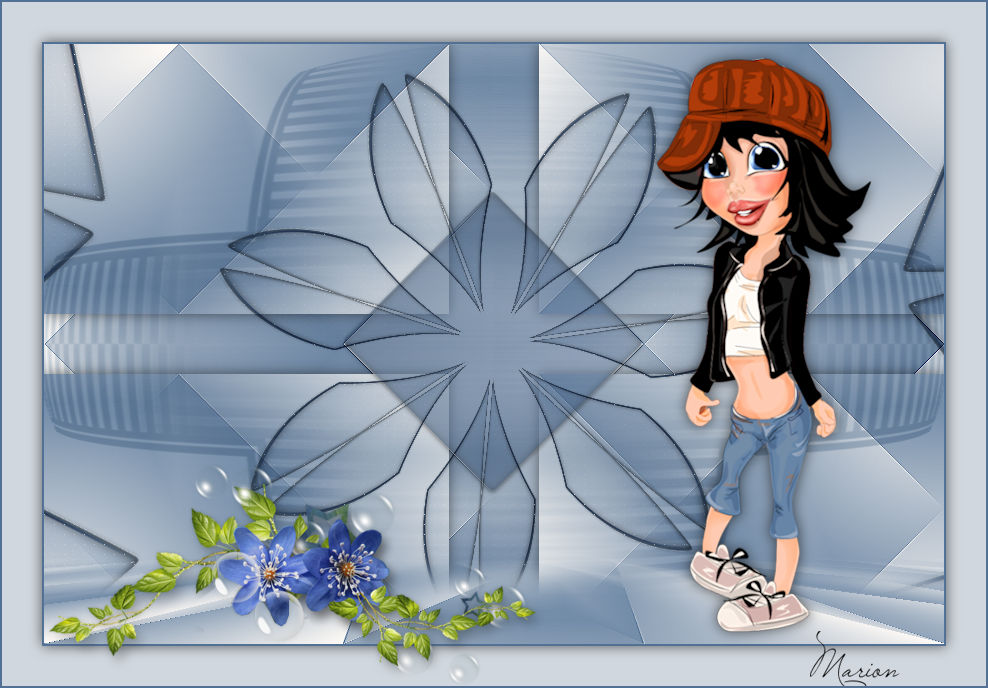
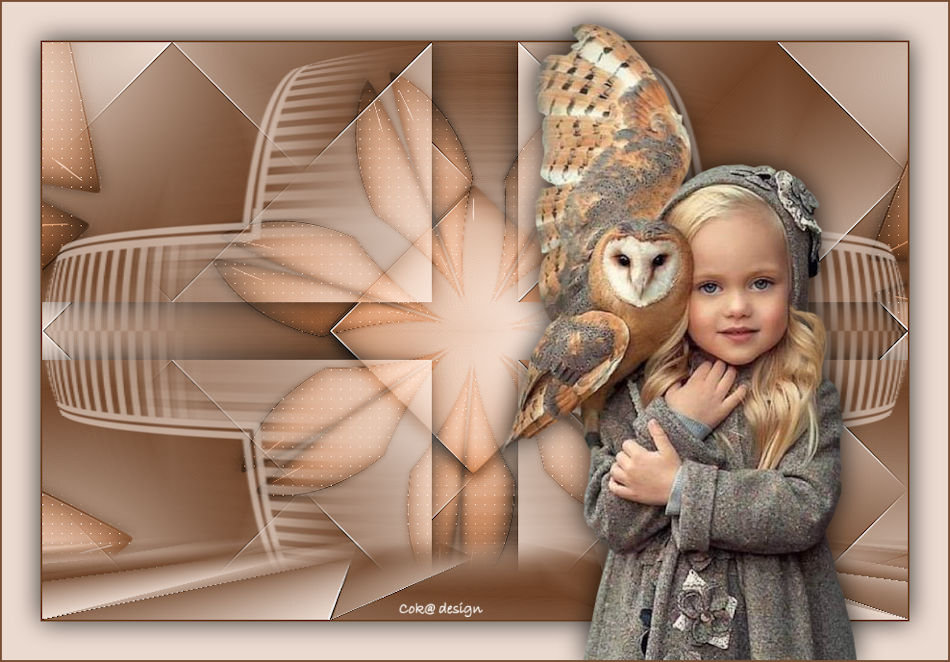
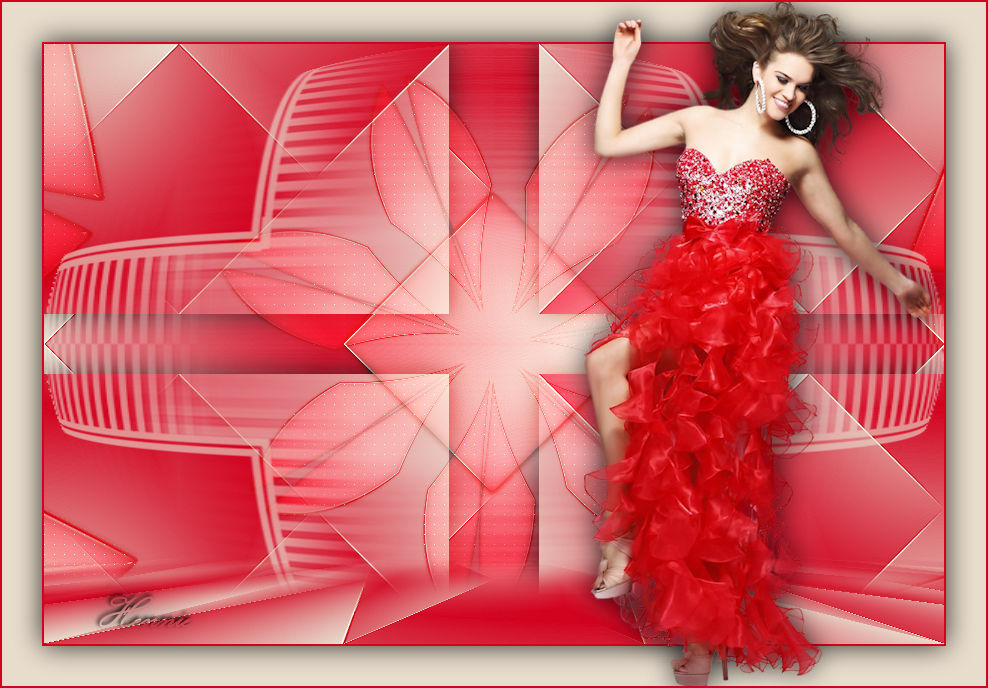
Open ----Tube--- LD-model-448.png.
Remove the watermark
Image - Mirror - Mirror Horizontal (Image - Mirror in older versions of PSP).
Image ---Resize ---80 %.
Resize all Layers NOT checked
Move the tube to the right side (see finished image).
24.
Effects---3D-Effects---Drop Shadow ----0---0---80---40---color black.
25.
Image - Add borders-Symmetric checked ---2 pixels --- with the dark color
26.
Add you watermark on new layer.
Save as JPG

|